I have a two year old son, and it has become apparent to me that he gets a little jealous and sad that I don't make things for him but his baby sister gets to try things on that come from mommy's sewing machine all the time. Soooo....I'm on the idea trail for things that I can make for Kaden. I made him a cape today, which of course has been done, but I'm going to do some fun freezer paper stencils. I also have two tutorials coming up, one for a messenger bag (for boys like mine who are with mommy all the time and want to cary a purse, but hey a "satchel" is so much more acceptable right? I mean Indiana Jones carries one:)) And an easy pullover sweat shirt out of fleece, hoping to have those up in the next few days.
--Also...I've got four orders to fulfil on etsy, three halloween costumes and one of my own designs! Busy, busy, busy, but I love it, I'm actually making money doing something I love. Its a great feeling
Thursday, September 30, 2010
Friday, September 24, 2010
Tutorial: T-Shirt to Girls Peasant Dress
Hello virtual (and some physical) friends! I have a tutorial for you all, I'm new to this whole thing so please let me know if there is anything I could change or improve on! I love to make new things for my daughter, and using clothes that don't fit me or that were given to me and I don't wear is a perfect place to start looking for new clothes for her. I also love the peasant top style, soooooo i decided to try and re-use and old t-shirt and re-style it into a dress for her. These are especially good for toddlers or 3-5 year olds.
Supplies:
Old T-shirt (any size really works, i used a 2T shirt to make a shirt, instead of a dress, for my 10 mo old daughter, the technique all works the same)
Scissors
Elastic (I used 1/4 inch, but really it just depends on how big a channel you want to make at the top)
Thread and needle or sewing machine
Steps:
1. Take your t-shirt and lie it out then fold it in half matching up shoulder seams and sleeves.


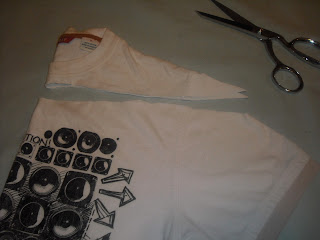
3. If you end up with a V like I did this time (of course when I'm taking pictures!) then fold one sleeve into the other and lay as flat as possible, then cut to make it more straight (a little variation is ok, we are just going to be folding it over anyway.


There you have it...I have a few I've made so far, but need to get my models to put them on for me, this picture just doesn't do it justice.
Supplies:
Old T-shirt (any size really works, i used a 2T shirt to make a shirt, instead of a dress, for my 10 mo old daughter, the technique all works the same)
Scissors
Elastic (I used 1/4 inch, but really it just depends on how big a channel you want to make at the top)
Thread and needle or sewing machine
Steps:
1. Take your t-shirt and lie it out then fold it in half matching up shoulder seams and sleeves.


2. Cut across the top of the shirt, detaching the neck and cutting into the shoulder.


with the V

after I straightened it out
4. make your casing, fold over about a half inch of fabric towards the inside of the shirt and pin in place, this will be the casing for your elastic.


Tip: what I tend to do is pin around the inside as I make my casing, but then switch the pins to be on the outside because I find that stitching on my machine from the top creates better looking stitches. Thats why it in the first picture the pins are on the inside of the shirt and in the second they are on the outside.
5. Stitch (either by hand or with your machine) around the neckline making sure to leave room for the elastic but catching the edge of the casing. Also, make sure to leave a space unstitched where you will insert your elastic

6. Measure out the elastic, my rule of thumb is a little less than half the circumference of the shirt to start.

7. Insert the elastic into the casing (I like to use a safety pin attached to the end of the elastic to help guide it, I also pin the other end of the elastic to the shirt once I have fed it into the casing all the way, this way it won't get lost in the shirt from the other end.

8. Once the elastic has been pulled through and the fabric gathered secure the end of the elastic with a pin and try the shirt on the one its intended for. This way you can see if it needs to be gathered more, when the neckline is the size that it needs to be sew the ends of the elastic together and stitch up the hole that you left in the casing. And there you go! Peasant shirt!

There you have it...I have a few I've made so far, but need to get my models to put them on for me, this picture just doesn't do it justice.
Tuesday, September 21, 2010
Dress of the night...
I got inspired, and then stayed up way to late finishing this dress...I think it's a great fall dress! With fun front pockets and puffy sleeves, I'm loving it. Unfortunately I don't have a model at my disposal every day, so we will all have to suffice with my dress form...


Monday, September 20, 2010
Back to Blogging
Wow did I fall off the blogging wagon! I admit it, I’ve missed blogging, and frankly I think keeping a blog is a major way to get exposure for my work. While I have been missing off the blog front, I have been extremely busy on the sewing front. I’ve been working on several projects, and purchased an add spot on Etsy for the 25th, so I wanted to get some good items up. I have so many sides of me its hard to narrow it down, I have my fun hippie simple side, but I also love business attire, and formal wear! What do work on!? So I’ve dabbled a little in different areas. Here is what I’ve done more recently, along with 4 other dresses that I will get pictures up of as soon as I can hook up with my favorite model again! (Thank you again Michelle for showing off my clothes for everyone)


This first dress is a re-fashion, and while it isn’t “my style” per-se I wanted to show what something can change into. Unfortunately I totally forgot to take a picture of the “before” but here is the “after”...


What I did to it: made a square neckline into a scoop, did little gathers on the straps to add some detail, made fabric flowers with faux pearl centers out of the ties that used to be on the dress, made a high slit on the side to add a little sex appeal, took the extra fabric in the back and made pleats along the deep V and added a zipper. Lots of little things to make a quite different looking dress.
The second outfit is a Tunic that I bought and loved for some reason, but it was very poor fitting and didn’t give any shape definition, so I added shirring under the bust to provide better shape. I love it best with jeans, but could be worn with leggings as a mini dress.


The third is an original, I like the fun breezy feel of the linen look material. I feel like dresses in this type of style can look good on anyone, it has a waistline similar to an empire, but without the exact same feel. Plus I love having dresses and tops that I can just pull on and don’t have a zipper or anything, I LOVE SHIRRING! The best skill I have learned by far. (well except sewing in general)


Lastly is my take on an Oregon Evening gown, I feel like this dress is straight out of Eugene. It is sexy, but has that Saturday market feel of a print on the skirt. The fabric is high quality organza though, and so much fun. Lined with the same silky satin that makes up the bodice. I love the low back as well, and I feel like it has coverage in the right areas but also has a sexy silhouette. I love a great maxi dress.


Like I said I have four other dresses I’ve made, a fun yellow shirred waist dress, a black on black striped dress with a fun zipper, a men’s shirt to dress re-fashion and a copy of a dress my friend wanted re-made that turned out great. So check back soon!
Subscribe to:
Posts (Atom)